
Highpod/Gigapod
Disclaimer: there are 1312 ways of doing this and this is only a recommendation based on experience, not a definitive guideline. Think about it, figure things out, trust your judgement, check with people around you, and if you feel unsafe don't do it. But in the end of the day this is not rocket science. Don't be intimidated!
What is a highpod and and what is it for?
A highpod is similar to a classic monopod . The only difference is that is in the crown of a tree (or in more rare cases like Lützerath, tied to another monopod). The process of building the highpod itself is already well-documented in the Danni-technical-zine, and this page is partly copied from there, and partly informed by the experience of people who build highpods in various other occupations, like Lützi, Fecher, or Banny.
A highpod has various use cases, including a potential function as a lightning rod, wind turbine above the forest, flag pole, or crow's nest. Most commonly though a highpod is used as a structure to significantly delay an eviction by having people climb on it. It is much harder to evict than a normal monopod, because it is much higher and harder to reach. Even after evicting it, it is quite hard to dismantle the pod itself, because of the fact that a trunk of several hundreds of kilos is standing upright in a crown of a tree, held up by ropes under tension.
"In the Danni Eviction we made the experience that Building crazy structures lifts activists spirits
and can create lots of struggle for those who try to get people off these structures. A Skymono can
be built with our basic climbing and building equipment, but can easily extend over the cannopy 10
meters, more is thinkable as well!"
Advantages of the highpod
from the technical zine:
- None of the anchor-traverses can be cut before the whole area is free of persons, otherwise the
Skymono could collapse. So freedom of movement through all traverses is given for a longer period of time - Some standard cherrypickers cannot extend over 30 Meters, so bigger machines need to be
brought in and maybe the ground must be prepared for their stability. - It takes at least two cherrypickers to get activists down, and they must move to multiple
parking-positions if climbers are not within reach. - Climbing cops will not climb up the beam, as they can‘t trust it. So if cherrypickers can‘t
access, it is not evictable and becomes a safe space for activists and valuable material. - Every structure, that is above the anchor traverses, cannot be fully destroyed before the mono
is down, because everything that falls on these ropes is a risk for the whole structure. So
tree houses on the anchortrees can be reoccupied if the eviction isn‘t complete by dawn. - The more anchor traverses are used, the less movability is possible for the cherrypicker-basket.
Stacking smaller monopods over each other will create quite a web. - Most cherrypickers with a basket cannot exceed much over 50 Meters, so climbing cops might
hang from the hook of a crane, but not a technical unit required to open a lock-on at this height. - The total amount of material is quite low, only for pulling it up a decent pulley system and
around 15 activists are required. -super cheap! - You get a great view of the defended forest!
Required Material
- main beam for the pod
The main beam for the pod should change in diameter as little as possible. more cone shaped pods mean weaker at the top and stronger at the bottom, so if you want them to be strong enough at the top, you will end up with very little weight at the bottom. In the technical zine it says ~20 meters long and minimum 20cm diameter where the anchor traverses are attached. This recommendation really depends on the use case: if the anchor tree of the of the pod is not that large, it would be irresponsible to load it with such a large pod. As the zine correctly notes: "A 20m beam 20-35 cm strong weights around 500 kg", which is not possible to rig in a lot of trees. If you are using a smaller pod and/or do not plan on climbing on the anchor traverses for some reason, it should safely be possible to go below 20cm in diameter where the traverses are attached.
Coniferous trees work well for this, because they usually grow fairly straight. Spruce, pine, or fir wood is also relatively light and flexible. Make sure to peel the beam before using it as it makes rigging easier and the beam more durable against insects, fungi and moisture. Removing braches is also strongly recommended for rigging.
- anchor traverses/ guylines
At least 3 anchor traverses are necessary, more is better. From 5 on one traverse can fail without risking the pod falling over. Quality polypropylene rope of 14 mm is recommended, one 220m roll might be enough for 3-5 traverses.
- pulley system (2:1 in the tree, 8:1 compound at the bottom)
- 100m static rope (minimum)
- 7 pulleys + carabiners (1 on the tree, 1 on the pod, 1 redirect at the stem, 4 in the 8:1)
- 2 loops of accessory cord (Raupe) for the 8:1
- 1 Distel (preferably thick aramide cord) + 1 mallion rapide for progress capture
- 4 heavy duty webbing slings (1 on the tree, 1 on the pod, 1 for the redirect, 1 in the 8:1)
The pulleys should preferably have ball-bearings, especially those that get the highest loads (anchor tree, pod, redirect). An alternative pulley system can also be built with a grip-puller winch (Greifzug) replacing the 8:1 at the bottom.
- base of the pod
The pod can either rest on a small platform or hang from the anchor tree. For the small platform you need beams, crossbeams, planks, and 8mm poly as well as tree protection (as for any normal platform). You can also hang the pod from the anchor tree. In this case you would want three pieces of 14mm polyprop for the pod to hang in, as well as tree protection and a spacer between the tree and the pod. For the spacer, a round beam of 20cm in diameter will do. Make sure to carve a nudge into it so the pod can pivot on the spacer, but not break out to the sides.
How to build it
Bringing the pod
After preparing the tree to become a beautiful highpod, bring it to the tree. It might be too heavy to carry it, even with a lot of people. In this case you can either use a heavy duty trailer, roll the beam on smaller logs (think moving big pieces of stone for building pyramids), or (if you have a clear path) you can build a pulley system and just drag the pod.
Place the pod with the top end to the tree and with the bottom away from it, this way it does not need to be stabilised while pulling it up. If you do it the other way around, the pod will stand up on its bottom next to the tree and potentially swing uncontrollably.
Preparing the (anchor) trees
Once you found the main tree, you should also find 5 anchor trees for the traverses. The angle between these trees should be roughly equal so that all traverses exert a similar force on the pod when stabilising it. Ideally, this means you have a 72 degree angle between all the five anchor trees. In terms of distance, there are multiple considerations to be made: In terms of forces, an angle between 45 degrees and 60 degrees offers a good balance between stability and force on the anchor points, according to the ARRL Antenna book, section Antenna Support (a book on radio antennas supported by guylines). In practice you might want to make the angle a bit flatter, so it is easier to climb the anchor traverses. Make sure the expected forces on the anchor points in case of a traverse rescue do not become to high. You can calculate them here. Other than the forces, you might be limited be the trees available and the equipment you have. The longer the anchor traverses, the higher the likelihood building them will become a pain in the ass.
The main tree of the pod should obviously be very tall and healthy, with the attachment of the pod being sturdy and not above a V-shaped crotch, which might critically destabilise the tree. The anchor trees of the pod should also be healthy, but do not need to be as tall as the main tree. Look for any damage on the tree itself, but especially on the section that you would like to anchor your traverse on and the root base of the tree to minimise the risk of the branch snapping of or the tree being uprooted in a storm. Once you have found a suitable anchor point, you can mark it by installing tree protection there, to protect the tree from the polyprop of the anchor traverse.
In the main tree, you can either build the platform, or install the spacer if you hang the pod. During this step, you can also already install the pulley system
Installing the pulley system
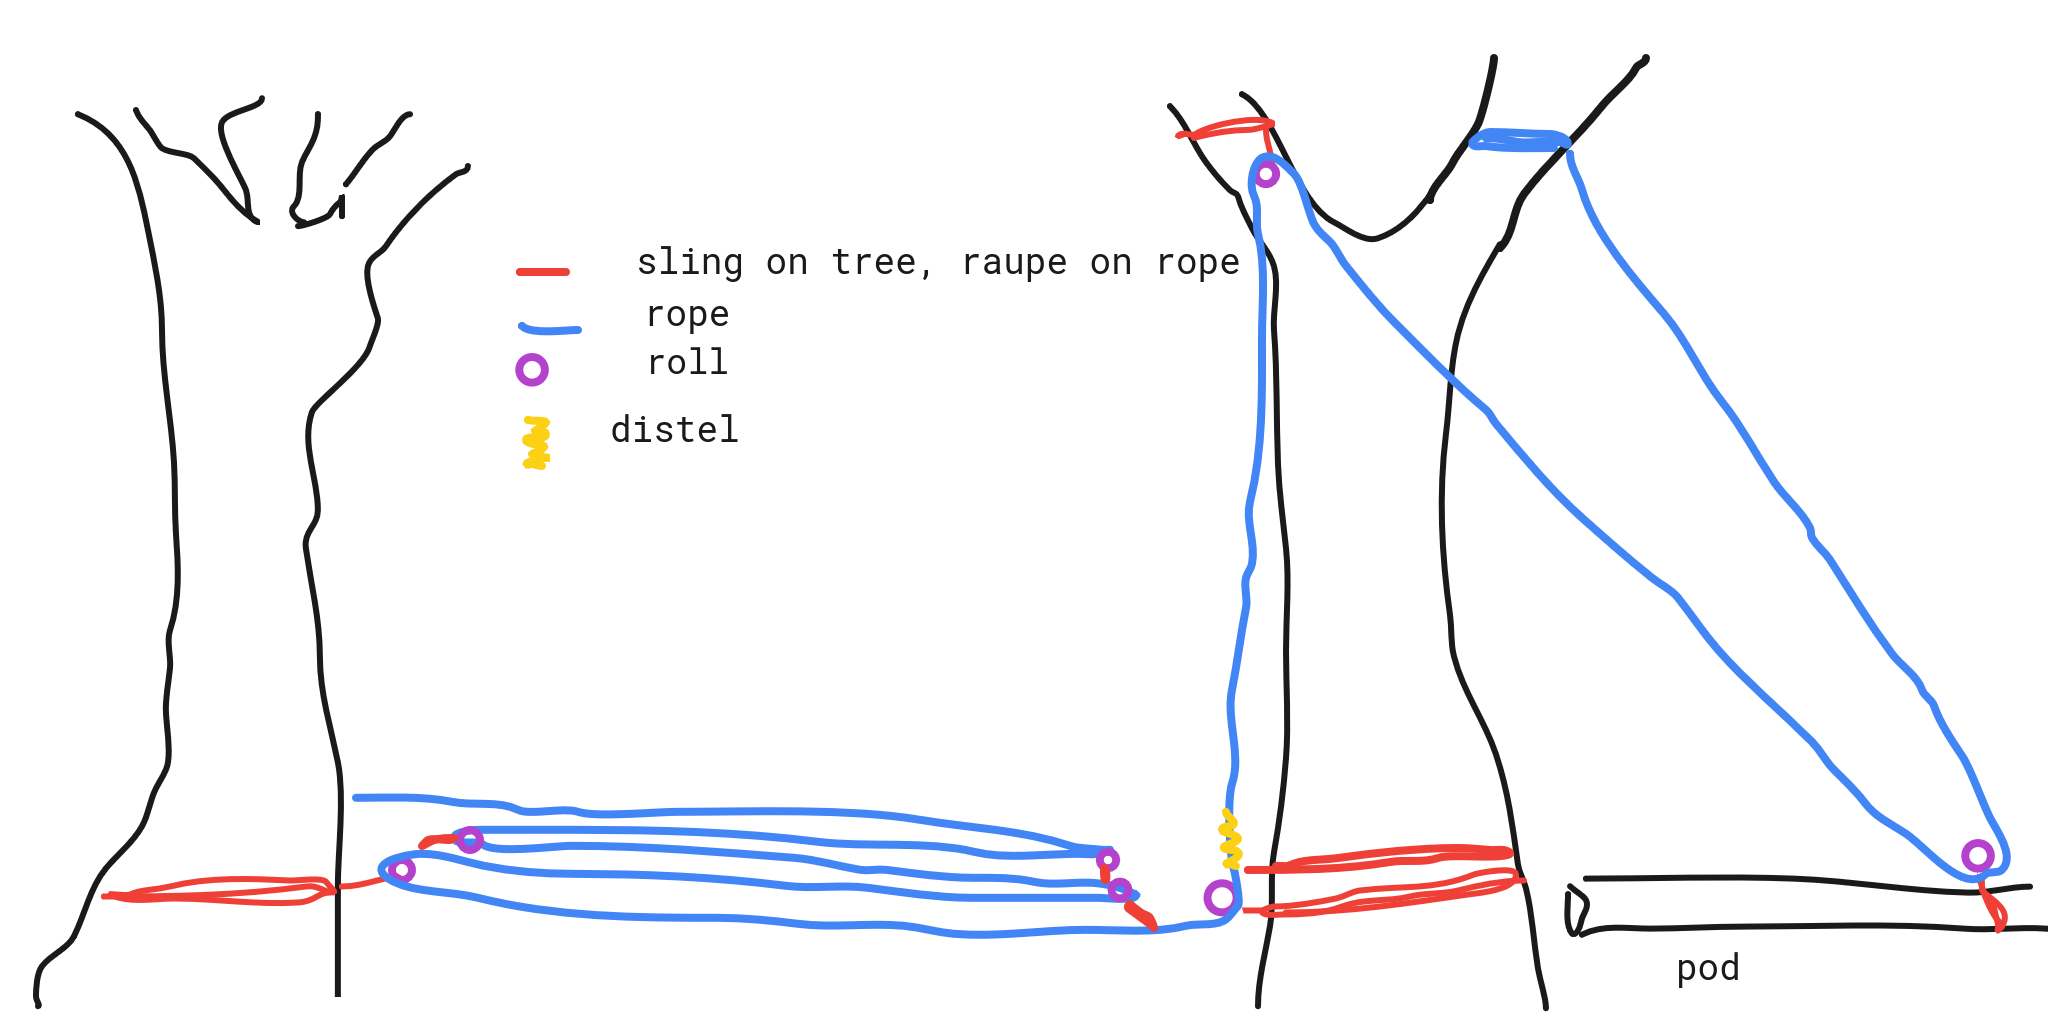
At this point, you need to install the pulley system to lift the pod into the first position. To do this, find a good spot at least 3 or 4 meters above the point where the pod is supposed to end up. Here you can build the 2:1 with one end of the rope on the tree, a bight of the rope going down to the pod, where it can be put through a roll, and a second roll up at the top. At the ground you can build a redirect at the stem, with the 8:1 compound behind it. The whole pulley system should look something like this:
from the technical zine:
"The pulley system should be setup with the option to increase and decrease the strength quickly. If
there is a risk of being interrupted by cops while pulling it up, the brake (eddi/grigri) should be
installed off the ground, so the remaining pulley system on the ground can be broken down quickly.
Even a setup with a vertical pulley system worked out well. We have worked with 1:6 up to 1:30
Pulley systems, somewhere in between is fine with 10-15 people pulling. The heavy duty rolls and
carabiners should be installed at the first few turns, if they have ball-bearings that is even better.
Standard climbing rolls have a lot of friction under such heavy loads, so they should rather be used
in the second multiplication. A pulley system with multiplications (a pulley system pulling on a
pulley system) does not need as much equipment as normal one, but is a little bit more complicated
to build and use."
Note: Since then, multiple iterations of this system have been tried out. Using a GriGri as a brake did not work out well in Fecher, where the tension on the rope going through the GriGri became so high, that it became almost impossible to use the lever. Furthermore, using any other device than a GriGri, will decrease the efficiency of the pulley system more because the angle of the rope going through it deviates more from 180 degrees. When using a Distel as a progress capture using thick Distel (and maybe multiple of them for redundancy). There are reports of building highpods and completely smoking the accessory cord of the Distel in the process, giving the pulley system rope a glassy coating and rendering it unusable after.
Pulling up the pod (step 1)
from the technical zine:
"The beam is first pulled up till it is standing upright. It is less likely to get stuck under branches if
the sling is attached at the very tip in the beginning. If branches might come in the way, it is better
if a few people are up the tree to direct it and cut branches if necessary. Avoid to climb or stand
under the beam, as long it is only hanging in the pulley system, because the rope and the carabiners
come close to their limits here! A 30m rope should be attached to the bottom of the beam to allow
ground support to pull if it gets stuck. The beam can be pulled up all the way to the pulley system
and then needs to be secured to the tree temporarily.
After loosening the braking-device, the sling on the beam should be attached on the middle of
the beam. That is, due to the conical shape, just a bit over the center of gravity and therefore is still
save enough as the only attachment point. Now it can be pulled up until the end of the pulley system.
The beam should now be more or less pointing out of the crown already and therefore the
traverse ropes can be attached now. The ropes should be attached lower if the beam is to thin at the
top. If it is strong enough, attaching them at the top is better, because if a second beam should be
placed on top of the first one, it is more stable like this."
Note: Depending on your situation, it can also be very possible to just skip the first step and attach the pulley system in the middle of the pod immediately. Because of the conical shape, and the center of gravity being lower, it will just lift itself into an upright position in a safe and stable way. The most tricky part is not getting stuck in branches, but if there are not a lot of low branches, the attachment in the middle is fine and will save you one step in the process. At this point, a climbing rope should also be installed at the top of the pod to make it accessible more easily.
Attaching the anchor traverses
There are multiple ways of attaching the anchor traverses and they really depend on a) the distance between the pod and the anchor tree b) the height difference between pod and anchor tree after step 1 of pulling up and c) the amount of trees/ branches between the pod and the anchor tree. All methods involve first getting a small tagline across (throwline or fishing line usually). This one should be thin, light, and preferably hold quite some weight without snapping. You then pull a bit of a bigger line across (either 4mm or 8mm poly in our cases) and then finally pull across the 14mm poly for the anchor traverse. For all methods it is recommendable to have high vis vests on top of the pod and in the anchor trees to increase the chance of seeing each other, which can be difficult especially when it is not winter.
- Method 1: throwing in
The first method is the easiest and often also the quickest. Sitting at the top of the pod, you take a throwbag and a throwline and throw into the anchor trees. There a person will fetch the throwline and you can start pulling over the next line.
Advantages: It is quick, easy, and requires little equipment. Most people also have experience throwing things.
Disadvantages: If the distance between pod and anchor tree is large, you are not really above the canopy yet, or the anchor tree is not significantly lower, it can become difficult or impossible to throw over the trees into the anchor tree.
One way of dealing with the disadvantages of this method is throwing in the middle between the two trees from both the pod and the anchor tree, having someone connect the throwlines and then pulling them tight. This might lead to a lot of branches being tangled in the throwlines.
- Method 2: shooting in
The second method involves shooting the throwline across, either with a slingshot or using bow and arrow. For both of these methods, you can get more distance and with a bit of practice also very high accuracy. For the slingshot method, nuts (e.g. M20) that go on bolts together with a fishing line have been pretty good. For both methods, you need to make sure that the throwline can unravel extremely quickly without getting tangled. Both the spool of a fishing rod, or tightly wrapping the line around the neck of a watering can have worked well in the past. In this case it goes without saying that the anchor tree and the area around it should be clear of people. Shooting projectiles at living beings has proven to be deadly in the past. If you are up for it, you could also try to just use a fishing rod if you have experience with it.
Advantages: It is quick, not very difficult and gives you a larger radius that you can reach with adequate precision. Some people have experience shooting slingshots or bows. Coolness factor obviously is higher than plain old throwing.
Disadvantages: Some additional equipment and practice are needed.
- Method 3: flying in
In the last couple of years small drones have become widely available and somewhat affordable. For really long distances or situations in which very high precision is needed (e.g. flying a line between two highpods) it might be useful to use a drone. It is generally possible to carry up the drone, tie the line to it, start it from the hand and then fly over to the anchor tree. Another method that has proven to be successful is starting the drone from the ground, with a ~4m long thin rope attached to it, flying it over the tree, attaching the tagline and then flying it over to the anchor tree. In either case, a mechanism to drop the load off the drone and into the canopy of the anchor tree is very helpful. It is also very helpful here to have high-vis vests on the pod and in the anchor tree, to make orientation easier. Handsignals for up/down, work done, and directions also help a lot.
Advantages: It is very precise in pickup and delivery. You are not limited to a straight line, you can fly in curves, or even makes stops on the way if you want to create a redirect. Distances are more or less unlimited with this method, it might just become more difficult to pull over the other lines.
Disadvantages: Flying the drone might take some practice, especially in challenging conditions. Sometimes it might not be possible at all to fly the drone because of rain, the dark, or too much wind. The batteries are also often the limiting factor, especially if electricity in the forest is limited.
Pulling up the pod (step 2)
from the technical zine:
"Now comes the trick: to stablise the beam, it must be held by the anchor-traverses. But if they are
under tension, we could not lift the beam up, as they would hold it down. So naturally the beam
tilts in one direction and is hanging in the traverses (with very little force normally). When the
traverses, that are not under tension, get release a bit further, the beam can be lifted further and will
then tilt into the direction of the traverses that were under tension before. Now they are not under
tension anymore and can be release a bit more. The coordination of this process can be coordinated
well from the base tree. Clear signals to the anchor trees and the people responsible down at the
pulley system is essential and that they fully understand the process."
There are some additional points that were found to be helpful since then. In the technical zine, it is already noted that the traverses should be secured with a Distel at the anchor tree, so that the tension can be controlled easily and the traverse does not need to be held all of the time. Instead of having one person sit in each tree to control the tension on the anchor traverse, it can also be useful to redirect the anchor traverses to the ground. This way, in theory, one person can walk between all the trees adjusting the tension on call. This is actually quite practical and does not involve all too much running around, since the tension can also slightly increase throughout the process of pulling up the pod, meaning only little slack needs to be given on the anchor traverses, but this also depends on the size of the pod.
It can sometimes be a bit hard to judge whether the pod is straight, just looking up and having no reference. Using the climbing rope on the top of the pod as a plumb line to check whether to pod is straight works quite well. Having the pod straight in the beginning with all traverses on roughly equal tension and then equally giving slack also worked well to keep the pod straight. Once the pod is up, all you need to do is replace the redirection and the Distel with tree protection and a Blake, as if you would build a normal traverse.
Resting the pod
Once you have the pod in its final position, you can either rest it on the platform and secure it to the left and right with clove-hitch-clove-hitch traverses between pod and main tree (with ample slack). If you hang the pod, you can tie 3 clove-hitch-clove-hitch traverses of about 50cm length between pod and tree underneath the spacer and slowly lower the pod into the ropes by giving slack in the pulley system. In either case, you want the bottom of the pod to be a joint where the pod can pivot. If you tie it in in a static position, you create a giant lever with large amounts of force on the pod (see some of the calculations below).
For the future
If someone ever wants to embark on a technical feat of engineering, feel challenged by this, it is theoretically possible with careful planning and calculations:
Measure the pod (from bottom to where the traverses are anchored) and the distance between bottom of the pod and the anchor in the anchor trees (for the second one, a laser meter should do). From this you can calculate a triangle whose corners are formed by: bottom of the pod, the anchor of the traverse on the pod, and the anchor in the anchor tree. The hypotenuse of this right-angled triangle is the anchor traverse, which you can easily calculate from the length of the pod and the distance to the tree. You can then add about 1.5m (depending on your pod) for the clove-hitch barrel-knot anchor at the pod, and some percentage of the length of the traverse (e.g. 5%) in slack because you do not want too much tension. Doing this for all traverses, you can calculate the length of all the anchor traverses for a perfectly balanced pod. You can then measure the desired length, put a stopper-knot on the rope at the right length and pull up the pod. For this you can use a munter-hitch (HMS) in the carabiner of the redirect at the anchor tree to keep some tension on the rope. Once the stopper knot reaches the carabiner, the traverse will not move further and all traverses will be tensioned equally. This way it is possible to pull up the pod in a controlled and upright position, without anyone having to be in the main tree giving directions, or people manually giving slack on the traverses. This could add to safety.
Force Calculations
Imagine all anchor traverses fail and the pod is just moving freely at the top, creating a giant lever at the bottom. This might also happen if you tie in the bottom and have loose traverses at the top. The below calculations make unrealistically strict assumptions: the bottom is assumed to be completely fixed, and the calculations ignore the conical shape of the pod assuming it would break at the base. In any realistic scenario in which you do not use the pod upside down, it would break near the top if you exert a cantilever force.
For a cantilever beam with a point load at the free end the bending stress at failure is
$$\sigma = \frac{M * c}{I}$$
where
- $\sigma$ = modulus of rupture (MPa), material dependent
- $M = F*L$ = Bending moment at the fixed end
- $F$ = force (N)
- $L$ = length (m)
- $c = d/2$ = distance from neutral axis to outer surface
- $I = \frac{\pi d^4}{64}$ = second moment of area (for circular cross-section)
solving for $F$ we get:
$$F = \frac{\sigma * I}{c*L}$$
For dry, coniferous wood (e.g. pine), we can assume a modulus of rupture ($\sigma$) of 70 MPa (can vary between 50 and 90 MPa depending on species and quality). Putting this together:
$$F = \frac{\sigma * I}{c * L} = \frac{70*10^6*2.48*10^{-5}}{0.0075*7.5} = \frac{1736}{0.5625} \approx 3088N$$
This means the force required to break the pod this way would be just above 3kN under the very strict assumptions, given healthy wood.
Keine Kommentare vorhanden
Keine Kommentare vorhanden